ENV: pfSense CE 2.6.0-RELEASE (amd64) as a KVM Guest on Proxmox 7.2
Update: Also tested across 2.7.X and 2.8.0
Goal: Class-Based Limiters to manage traffic shaping on the WAN. Attempting to set priorities for each class whilst still allowing any-one client to use the entirety of the WAN Bandwidth if no other client is contenting.
BIG Item of Note: As found while diagnosing issues with this setup, Captive Portal’s and Limiters cannot be run simultaneously on at least pfSense CE 2.5 and 2.6. See https://redmine.pfsense.org/issues/12829#note-15
A lead-in note on Limiters: Limiters are aimed at being a work-conserving form of traffic shaping. If no contention is observed a single device can consume the entirety of the limiters bandwidth. Limiters in other context’s could be used to reserve bandwidth; by having 2 limiters per direction and splitting off one (with say 20% of the link bandwidth) for exclusive use by a real-time service like VoIP. This example bellow will use one limiter per direction with priority queuing to achieve a true class-based weighting while maintaining a work-conserving environment. For a detailed explanation of limiters/traffic shaping in pfSense I recommend the in-depth YouTube series by Mark Furneaux on the subject. Comprehensive Guide to pfSense 2.3 Part 9: Traffic Shaper.
Prep-Work
Before getting in and adding anything to pfsense its well worth defining all your limiters, queues and traffic classes.
Sides, Pipes and Directions
Through the process of implementing my own setup of limiters I found is easiest to refer to interfaces as either “lan-side” or “wan-side” using the idea that any traffic you want to control will pass from one side, through a limiter, to the other side. This makes it easier when trying comprehend what is happening when a client on your LAN is connecting to either a WAN destined server or say a site-to-site VPN remote network. Both the WAN and VPN tunnel counts as “wan-side” and it reduces the chance of traffic navigating the limiter twice, once as it enters the VPN tunnel, and then a second time as it passes from the tunnel to the actual WAN interface.
Pipes are your limiters, as you are most likely dealing with a full duplex, hopefully high speed symmetrical service your pipes need to be configured to be just under the specified speeds of your service in order to be efficient. Two will be required for this setup, one for download (wan to lan-side), one for upload (lan to wan-side) to achieve a full duplex service. The pipes (limiter) can be configured with different speeds in each direction on asymmetrical links. Admins with low service contention ratios (5:1, higher or not listed contention) should consider derating. The same applies for services setup on copper/mobile based WAN services. If the WAN max speed is being capped by the service media and is variable, limiters may not be for you. Or some sever derating may be required (and can be easily reconfigured later).
Direction; though the floating firewall rule section of this piece direction will come into play. in or out on the interface the rule applies to. match direction ‘both’ is not usable for limiter matching in this style.
Limiters
One limiter for each direction. When on a fiber based service with consistent single-user speed test I’ve found you can over-spec the limiter by around 12% to account for packet overheads. 100/50 becomes 112/56. With tuning being recommended under production loads to achieve a rate that is just under and never exceeding your actual service speed. You want the limiters to control the drops and shape the traffic. Not the service limiter further up the line that does not share the same weightings or priorities you have.
Limiters are virtual pipes within the network layer of the firewall. They can have traffic virtually sent through them from any other interface on the firewall. Pfsense use dummynet within FreeBSD. Limiters have a maximum speed that is configurable. Each limiter has a scheduler that comes into play when the limiter is approaching full. This scheduler has the simple job of deciding what gets dropped when the limiter is full. Queues and their weight guide the scheduler in what will be put in a buffer and sent, vs what will be dropped.
Queues
Many queues can be children of a single limiter. Queues have defined weights and tell the scheduler which packets get dropped first. Or by extension which ones have a higher priority. Queues are given weights between 1 and 100. These are not %’s through. The weighting can be through of as. If you have a limiter that’s nearing full and 3 saturated queues of traffic, each weighted 5, 25 and 80. Then per buffer the scheduler will take 80 packets from the 80 weight queue, 25 from the 25 weight queue, and 5 from the 5 weight queue. repeating, moving onto the next queue if a queue is empty and running until the buffer is full and then flushed. Queues that are then overfull at the end of each cycle have some packets dropped from the tail of the queue to keep things near to real-time. TCP packets that don’t arrive are automatically retransmitted but TCP will realized theirs congestion and try for a slower rate; UDP packets, by their nature, don’t require a retransmit at the network layer, the application may try again through but hopefully at a slower rate. Weights also need to be considered in a one-to-one spec as well. If you have many queues, but only two are contenting for bandwidth right now, the one with 40 verse the one with 10 will get 80% of the traffic in the limiter. And when you have two queues, 80 vs 5 the 80 weighted queue will get 94.1% assuming they’re both screaming for bandwidth.
Traffic Classes
This is where you sent your priority list. What’s most critical and needs to have the least drops. What okay to be dropped a lot if theirs contention and critical services needs to go out/in first. What weighting to each of these get. How many times is one more important then another.
As an example. For a SME network I know of the traffic is split between 4 tiers.
– Weight 1 – Guest Wifi Network, which can be slowed down to a crawl in the event of contention.
– Weight 25 – General and unclassified traffic – Background web surfing by staff. Not-considered-critical services, YouTube and streaming etc,
– Weight 50 – Priority Services – Web Traffic for the CRM system, SSH for a CRM Application, VNC for internal support and Networking Monitoring Services.
– Weight 100 – voice and icmp – Two low bandwidth but high priority real-time services that should be rarely dropped. ICMP is here to ensure that GW monitoring on pfsense is accurate and to mitigate against incidental failover to a backup services because high bandwidth was misunderstood as a downed link.
Making your own classes before proceeding will make your job later easier.
Traffic Classification
With your traffic classes sorted we can work out how your going to classify the mess of traffic into each class. Using the example classes above here again we put together a base for how the traffic will later be sorted by the floating rules in the firewalls tables. Note that the firewall floating rule table is not like the standard interface table. Traffic not just going in but out is checked against the floating rules based on the direction flag. Traffic passing through the floating “Match” rules we will be creating passed through all the match rules and traffic can be reclassified multiple times without suffering a performance loss. So that’s how we do it.
First up, we classify all traffic crossing from one side to the other as weight 25 (general/unclassified).
This is to catch and appropriately queue all traffic that isn’t upgraded or downgraded by later rules.
The weight 50 priority protocols queue. TCP that has dest port 22 on the crm system. TCP with dest port 80/443 on any internal subnet. tcp dest port 5900 for vnc, tcp dest port 10500 and 10501, udp dest 161 for SNMP. All these matching packets are “upgraded” from weight 25 to weight 50.
Then the upgrade from 25 to 100 of anything ICMP proto. Or anything to/from the isolated voice vlan.
Followed by the downgrade from 25 to 1 of anything going to or coming from the isolated guest vlan which can access the internet but not any internal subnets as defined in its own interfaces firewall table drop rules and not affected by the match rules on the floating table.
A few notes:
– Web traffic to a SIP phones web interface on the voice vlan would technically enter the firewall, be classed 25 for unclassified/general, be upgraded to 50 as its tcp on a web port to an internal network and then be upgraded further to 100 as the traffic is matched against the voice vlan destination.
– Meanwhile ping traffic from the guest network would enter, be classed unclassified at 25, be upgraded to 100 by the icmp/voice match rule and then downgraded to 1 by the guest network rule; would exit the tables and enter the limiter with weight 1 as that was the final classification it was given.
– Also remember here that these rules will only come into play if the limiter is nearing full and the queues are contending for bandwidth. On a quiet day with this setup a guest network user could get 99% of the pipe is very little other traffic from the other queues is around to contend its claim. But as soon as some weight 100 voice traffic dials in the guest network gets stamped straight down at a ratio of 100:1. This is what makes the limiter setup work-conserving. Yes in practice the voice traffic would only be near 105kbps per direction for a single call, but the voice network would experience near-no drops and the guest would only have the remaining limiter capacity available to utilize.
– Two competing data stream within the same queue that are both screaming for bandwidth will be given a rough fair-share of the available weighted bandwidth if the limiter is being hit so keep that in mind.
Implementation
By now you should have a list or diagram of:
- Your two limiters, their rough speeds and directions.
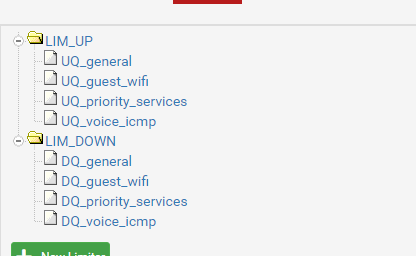
- I used the simple “LIM_UP” and “LIM_DOWN” naming for the limiters
- Your queues and their weights.
- I named the queues a descriptive “UQ_<class>” for upload queues and “DQ_<class>” for download queues.
- Also found it a good idea to /not/ put the weight # in the queue name. If that weighting changes, which for my projects they did multiple times, then you have to change the weight, change the name of the queue and then go through and find each rule that directed traffic to the queue and fix the queue selection that changed to <none> as soon as the queue name was changed.
- Queues can be asymmetrically weighted for the same traffic class. This tutorial will be doing symmetrical queue weights for upload and download traffic.
- Make sure to decide of a weighting for your unclassified traffic. Everything else that falls outside of your upgrading or downgrading queues.
- A basic list of firewall style match conditions that classifies traffic into those queues. (All traffic with dest port x; all traffic to or from this priority subnet/fw interface; all traffic destined or sourced from this remote ip; etc…. just a dot-point list is good.)
Create Limitiers
Under Menu > Firewall > Traffic Shaper goto the Limiters tab.
Create a new limiter
Tick enable
Name it LIM_UP
Set your bandwidth and unit
Set Mask to Source Addresses and mask bits to 24(v4) and 64 (v6)
(All other items left default)
Notes:
During tuning at the end:
– The mask can be modified to drill down into the limiter info and confirm its working as configured.
– The Queue Management Algorithm can be modified to drop packets in a way that may be more suited to your setup.
– The scheduler /cannot/ be modified away from “worst-case weight fair queuing”. All other schedulers ignore the queue weights and will not work with this style of limiter setup.
– Queue Length and Bucket Size can be tuned dependent on fw memory, user counts and pipe sizes.
Do the same for LIM_DOWN.
But set mask to destination addresses. Same 24/64 for the bits.
Create Queues
Going into each of the saved limiters you create your queues by clicking “add new Queue” at the bottom of the limiter config. We’ll be adding the same queues with your specified weights to each of the two limiters. X number of classes each with their own Queue under LIM_DOWN and the same for LIM_UP. The first queue you should add is the general aka unclassified queue. “DQ_general” and “UQ_general”
– Again make sure the queue is enabled.
– Name it. DQ_<class name here> / UQ_<class name here>
– Set your weight in the Advanced Options weight field 3rd from the bottom and save the queue. All other items are default.
Apply changes once both limiters and all their queue’s are added.
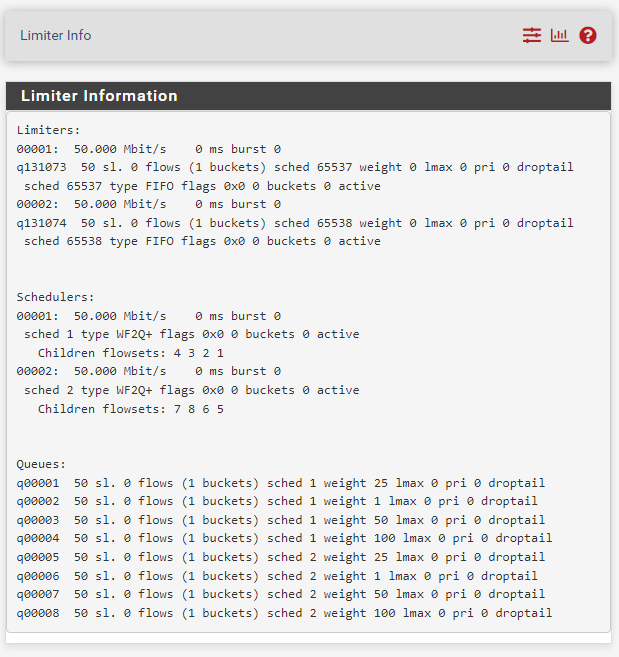
Limiter Info
Go to the “related status” page on the limiter config page by clicking the bar graph icon in the upper right. Also found under menu > diagnostics > limiter info.
The so-called ‘lan-side’ interfaces and alias
Create a written list of all your lan-side interfaces. For a very basic firewall setup (lan and wan) this will just be your lan interface and lan subnet. For a more advanced setup with a separate guest, users, admin, printers, wifi and testing networks etc this will be all your lan-side interfaces in a list.
Also add a firewall networks alias. I’ve called mine “lan_side_networks” with all the ipv4 and if applicable ipv6 subnets that make up all your lan-side subnets. Creating a “wan_side_networks is redudant as we’ll just use the invert match option in the rule to !lan_side_networks refer to everything else.
Your written list of all wan-side interfaces should include any site-to-site and client-to-site (road warrior) vpn interfaces. And these subnets should not be included in your lan-side subnets alias.
Firewall Matching
This is where we start sending traffic at the limiters.
This section will give a detailed description of how to match all traffic to your general queues. Followed by some specific examples of ways to match traffic. The rest will be up to you.
Many items of note:
– Matching and then queueing is done based on the first packets of a firewall state between hosts. If you change the match rules to point to a different queue; existing states will continue to be queued in the old queue. Only new sessions/states will go to the new queue. Either manually clearing states and forcing sessions to reestablish/restarting the firewall may be required to fully test changes.
– I’ve found that certain actions with the limiters/queues will require a firewall restart to fully apply Removing/renaming queues especially. Changing weights not so much. ‘Ghost queue’ in the limiter info page were common after removing a queue but not yet restarting.
– Floating firewall match rules are the easiest way to send traffic to queues. Floating rules are almost the exact opposite in their operation compared to normal interface rules so prepare to learn a new concept or two.
– Queue’s can be assigned on normal firewall interfaces but this A) separates you priority queuing configuration away from a single easy to read location. and B) requires you to set and then maintain the queue settings for all “pass” rules on each interface. Or setup your interface rules with a whole list of blocks for everything you don’t want with a singular pass rule at the bottom that both passes the traffic and sets the queue. Overall, floating rules are centralized and easier. Plus this post is only covering floating rules.
– Floating match rules are backward to normal interface firewall rules.
Where as with a normal table the first match’s action is executed, be it pass; block; or reject. Matching rules merely add/remove/update advanced options on the packet and allow it to continue through the firewall. Every packet crossing your firewall will be run though the match rules at least once and being inefficient with the match rules will create bottlenecks on small system’s; it wont affect performance but will be a waste of resources on larger systems.
– With this order of operation in mind its best to setup your match rules in this order.
1. general matching of all traffic putting everything in your unclassified/general queue so that anything not upgraded/downgraded later on does not leak past the limiter and negate its benefits.
2. matching that puts traffic in upgraded queues (higher weight)
3. matching that puts traffic in downgraded queues (lower weight)
doing broad interface/network/protocol level matches at the start of each section and then specific host or port level matching at the end of each section.
‘Out’ rules will need to be used for traffic that originates on the firewall. Like ICMP from the gateway monitor, or squid traffic if you are running a squid proxy on the firewall itself.
Create the general match rules
Under Menu > Firewall > Rules. Go to the Floating Table.
Create a new section called “Limiter Matching” to keep these rules sorted from other rules you may already have.
Create a new section bellow that call “General Traffic Matching”
Create a new rule.
Action = Match
Quick = disable (quick does not have an effect on match rules)
Interface = /your wan-side interface/ (see Sides, Pipes and Directions section above for desc)
Direction = in
Address family = IPv4 or both v4 and v6 if you’re running duel stack.
Protocol = any
Source = any
Dest = any
Click advanced options to show the full list.
In the second field from the bottom
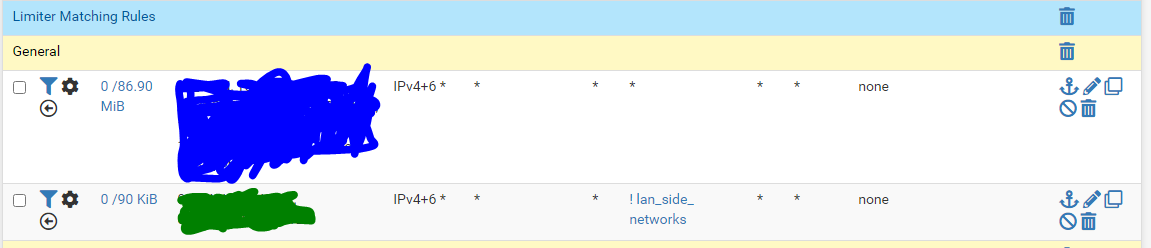
In / Out pipe: set the first field to DQ_general and the second field to UQ_general. (as the rule matches on traffic coming in wan-side, the download queue is mentioned first (in pipe), and return traffic on the same state will be put in the upload queue (out pipe).)
The rule above will match all traffic originating wan-side and going to either lan-side (Mainly natted port forwards) or another wan-side destination. This is to also include traffic for road-warrior whos default gateway is back over the tunnel to your firewall.
– Save and move to the first position under your matching section.
Create a new rule (not mentioned items are same as above).
Action =match
Interface = /all your lan-side interfaces/
Direction = in
Source = any (as itll be a lan-side source)
Dest = alias: ! lan_side_networks (this is to ensure that only traffic originating on your lan-side going to the wan-side is caught by the limiter. You don’t want users to have slow access to a local printer on a different vlan just because you wan bandwidth is under contention).
In / Out pipe: UQ_general, DQ_general (as this is lan-side originating states will go in the upload queue, and the return on the same traffic will go in the download queue)
– Save and move to the second position.
Apply the firewall rules and check back with limiter info. States should start appearing showing /24 network wide stats only under the weight <your general queue weight> queue. Stats will show a running 60 second stat. Of total packet counts/bytes and dropped packet counts/bytes per bucket per queue.
Note this setup is not perfect and wont fully catch all streams of data especially those coming in one vpn interface and going out the wan, or a different vpn interface. For a basic setup this will work.
Matching Subnet/Interface Wide Traffic
For a subnet such as a voice VLAN that only contains your SIP phones and/or you phone system.
(Again only differences from first example are mentioned)
Create a new section
Create a new rule.
Interface = /your voice vlan/
Direction = in
Dest = ! lan_side_networks
Pipes: in=UQ_voice_icmp out=DQ_voice_icmp
-Save
And the second
New Rule
Interface = /your wan-side networks/
Direction = in
Dest = alias: /your voice network subnet/, this can also be done by using the <interface_name>_subnet option from the dest drop-down.
Pipes: in=DQ_voice_icmp out=UQ_voice_icmp
-Save
In the screenshot bellow the second rule is used next-to-never as just about all of the states from the voice network almost always originate within the voice network and only match the first rule. The second rule could be considered to be dropped.

Bellow are too be added further examples
Protocol based Matching like ICMP

First is an out rule, with all the wan-side interfaces listed. Is has a Pipe in=UQ_voice_icmp to give it a high weighting and no out pipe as their is a limitation within pfsense. This will will match any outbound pings from any host but is mainly to catch pings generated on the firewall. Mainly the GW monitor.
Second is a in rule from lan-side with UQ_voice_icmp and DQ_voice_icmp configured
Third wan-side in. with opposite pipes.
Destination Port based matching for services like http/https

The above rules could be used individually or together.
The first in rule queues all web traffic into its own queue which can then assign a higher or lower weight.
The pipes are set in=UQ_ out=DQ_
The second rule is also an in rule. with the source being the wan-side interfaces.
This will queue traffic for web services that came in over nat rules or from a VPN source.
Pipes are set in=DQ_ out=UQ_
Single Host based matching like for a file server located in a busy lan.

Both rules above are in rules. The first catches traffic from the single host within a network, in this case the file server into its own queue. If running IPv4 and 6 duel stack make sure the alias in question has both the 4 and 6 addresses of the host. This rule will catch traffic originating on the device, for a file server this may be automatic backups to an internet or remote vpn host.
pipes in=UQ_ out=DQ_
The second rule catch’s all inbound traffic from the wan-side interfaces, this will mainly be remote vpn users, but could be NAT traffic to the file server if you like to live with a certain minimum level of risk.
pipe are in=DQ_ out=UQ_
Summary – Tertiary Testing and Tuning
Once you have all your traffic in their queues it may be worth completing some testing to ensure lan-side to lan-site traffic is skipping the limiter and all wan-side to wan-side traffic is passing through each of the two limiters once. And then creating more rules to negate any previous bad matches or queue assignments.
During a slow period perform speed tests to public speed tests servers. Tests should run near the limiter speed limits. A test that returns a result that just bellow exactly 50% of a limiters speed may indicate a double loop where traffic is going through the limiter twice, contenting with it self and halving the actual throughput.
Test file transfers to file servers on different lans. Make sure the traffic is near expected speeds and not being included in the limiter by mistake. Run test copies of big files in both directions.
Run an extended data copies across the WAN while having several voip calls running lan-to-wan. Look at the limiter info and ensure traffic to/from the voice subnet has little to no packet drops. Get user feedback on if calls were choppy, delayed or general a bad experience.
Tuning limiter options will all be your own experimentation. I’ve kept all configured system ive worked on using tail drop without any issues. But the other Queue Management Algorithm’s may suit you better.
Tuning of Queue Length and Bucket size (slots) on the two limiters may also be required. From what I’ve read 256 for each is a recommendation for services around the 100/100mbps area. and at least 512 for each around the 500/500mbps area. The bucket size setting may also need to be tuned higher if you have a larger number of active devices, say 100+ behind your firewall all contenting for bandwidth. Increasing any of these items will eat into your available MBUF allowance and memory. The values of both of these can bee seen live on the pfsense dashboard under the system information window. You’ll need to adjust memory and buckets per limiter as required.