ENV: Unifi Cloudkey Gen2 Plus running Protect; Unifi G4 Doorbell; Node-RED; old 433 mhz doorbell and chime box, old shelly1 smart relay.
An Australian alternative to the UP-Chime (Unifi Protect Chime Box) / cheaper alternative especially if you replaced your existing working doorbell with a Unifi Doorbell.
High level description: Unifi Protect running on local CK. Node-RED has a user listening to protect message over its wss (WebSocket Secure) service. When a “type=ring” message is detected; shelly1 simulates button press of the old door chime’s button, which causes the chime box to ring the doorbell. Less than 500ms from Protect Doorbell button being pressed to chime box starting its little tune.
Note: Node-RED used only, not HA. You could easily adapt this setup to notify you via any other Node-RED output.
Unifi CK to Node-RED
First create an appropriate role and local user on your cloud key. At the Unifi OS Control Panel > Admins > Manage Roles > RO Access to Protect and optionally Network. I then created a ‘nr-api’ user and set a long random password. Make sure to not enable online access so it’ll be a local user.
In Node-RED the package is “node-red-contrib-unifi-os” https://flows.nodered.org/node/node-red-contrib-unifi-os .
The event listener looks like this
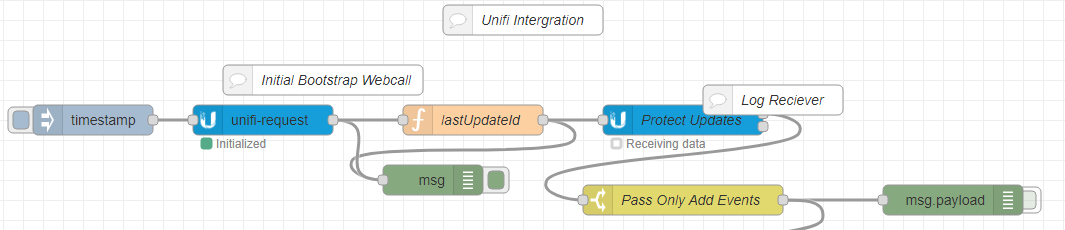
The above flow is able to be imported into your system by copying the json bellow and using the flow>import option in Node-RED .
[{"id":"25d193e8.931aa4","type":"function","z":"83e0e3b871853a50","name":"lastUpdateId","func":"if (\"lastUpdateId\" in msg.payload) {\n return {\n payload: {\n endpoint: `/proxy/protect/ws/updates?lastUpdateId=${msg.payload.lastUpdateId}`\n }\n };\n}","outputs":1,"noerr":0,"initialize":"","finalize":"","libs":[],"x":550,"y":1160,"wires":[["1b0f15fa.bf17ea","b90c42d7414e3209"]]},{"id":"5e958d35.6f65cc","type":"unifi-request","z":"83e0e3b871853a50","name":"","accessControllerNodeId":"1657bcded6fd3efb","endpoint":"/proxy/protect/api/bootstrap","method":"GET","data":"{}","dataType":"json","x":340,"y":1160,"wires":[["1b0f15fa.bf17ea","25d193e8.931aa4"]]},{"id":"1b0f15fa.bf17ea","type":"debug","z":"83e0e3b871853a50","name":"","active":true,"tosidebar":true,"console":false,"tostatus":false,"complete":"true","targetType":"full","statusVal":"","statusType":"auto","x":510,"y":1220,"wires":[]},{"id":"ed307f26.4c36e8","type":"inject","z":"83e0e3b871853a50","name":"","props":[{"p":"payload"},{"p":"topic","vt":"str"}],"repeat":"","crontab":"","once":false,"onceDelay":0.1,"topic":"","payload":"","payloadType":"date","x":170,"y":1160,"wires":[["5e958d35.6f65cc"]]},{"id":"7e20965a0d4f9a1c","type":"debug","z":"83e0e3b871853a50","name":"","active":false,"tosidebar":true,"console":false,"tostatus":false,"complete":"false","statusVal":"","statusType":"auto","x":1030,"y":1240,"wires":[]},{"id":"b8af71a744e5b2dc","type":"switch","z":"83e0e3b871853a50","name":"Pass Only Add Events","property":"payload.action.action","propertyType":"msg","rules":[{"t":"eq","v":"add","vt":"str"}],"checkall":"true","repair":false,"outputs":1,"x":760,"y":1240,"wires":[["7e20965a0d4f9a1c","52dc5a0620ba05ed"]]},{"id":"b90c42d7414e3209","type":"unifi-web-socket","z":"83e0e3b871853a50","name":"Protect Updates","endpoint":"/proxy/protect/ws/updates","accessControllerNodeId":"1657bcded6fd3efb","reconnectTimeout":30000,"x":760,"y":1160,"wires":[["b8af71a744e5b2dc"],[]]},{"id":"cbe61089a15bb3a7","type":"comment","z":"83e0e3b871853a50","name":"Unifi Intergration","info":"","x":600,"y":1060,"wires":[]},{"id":"5042c73b91303fec","type":"comment","z":"83e0e3b871853a50","name":"Initial Bootstrap Webcall","info":"","x":400,"y":1120,"wires":[]},{"id":"d50f51038f4bc775","type":"comment","z":"83e0e3b871853a50","name":"Log Reciever","info":"","x":850,"y":1140,"wires":[]},{"id":"1657bcded6fd3efb","type":"unifi-access-controller","name":"","controllerIp":"","controllerPort":"","controllerType":"UniFiOSConsole"}]
On the tail of the “Pass only Add Events” switch in the previous flow Ive places a type splitter. (switch)
Copy this code:
[{"id":"52dc5a0620ba05ed","type":"switch","z":"83e0e3b871853a50","name":"Type Splitter","property":"payload.payload.type","propertyType":"msg","rules":[{"t":"eq","v":"smartDetectZone","vt":"str"},{"t":"eq","v":"motion","vt":"str"},{"t":"eq","v":"ring","vt":"str"}],"checkall":"true","repair":false,"outputs":3,"x":210,"y":1400,"wires":[[],["35baf1d04b16db06"],["e7f3814766bd8b17"]]}]
The Type Splitter with split off the 3 different type of events that you may want to monitor.
“ring” events, aka doorbell rings. “motion” events; which could be used for motion activated lighting. and “smartDetectZone” events which are fire when a G4 camera or newer detected a person/vehicle within a set area.
Node-RED to doorbell chime (activated by a Shelly1 relay board)
Through trial and error I was able to connect a shelly1 relay board into the 433mhz remote button for my old Arlec Door Chime. The door chime by happenstance ran off a A23 size 12v Alkaline Battery. The Shelly1 has an option to run off 12VDC. So i soldered them both on the bare wires of an old 0.5A 12V plug pack. And soldered the I/O contacts of the shelly1’s dry relay across the output of the 3v regulator on the remote and across to pin8 on the EV1527 RF Encoder chip on my particular door chime remote. When the relay activates it’s basically the same as if the button has been pressed. If you remote has a button/switch this same action may be achieved simply by putting the relay contacts on either side of the button.
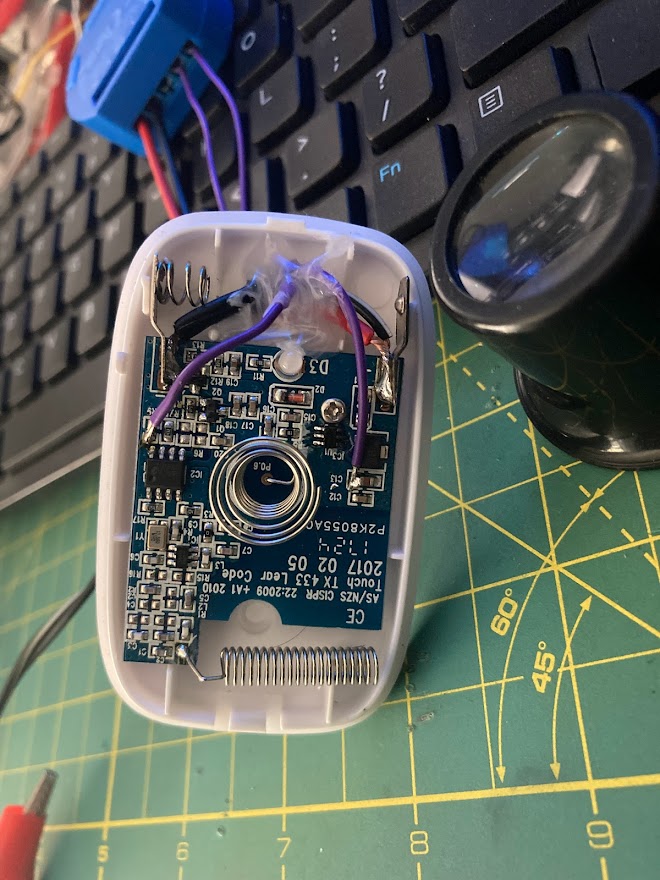
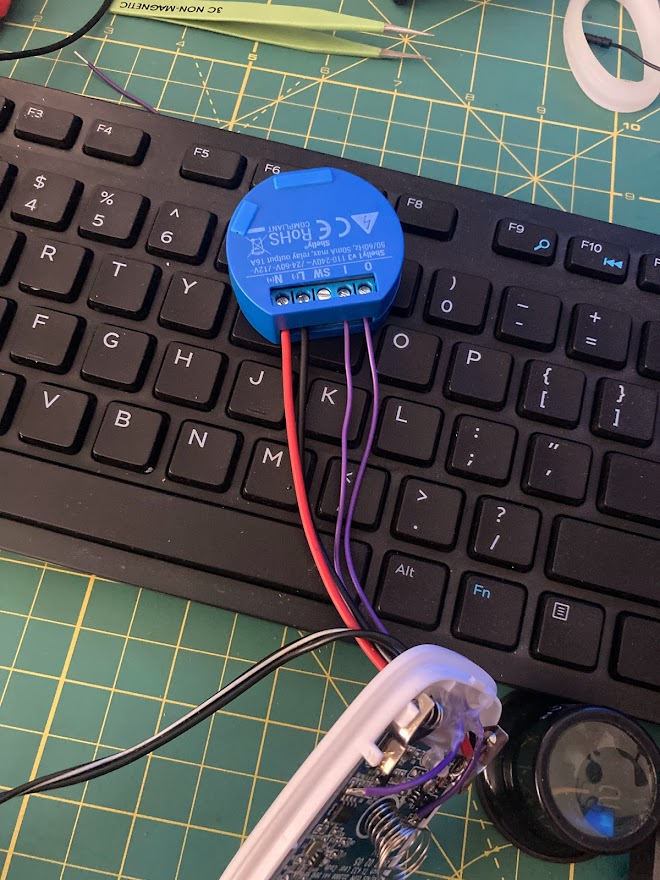
A 6mm hole in the back of the remote to pass the cables through. Soldered direct onto the battery terminals where they meet the PCB. Some tiny fly leads to attach onto existing SMD pads. and some hot glue to retain everything.
The front cover goes back on the button, and the button still functions. Removing the glue, desoldering the wires and reinstalling a battery would take this remote back to original functional state, so this isn’t quite destructive repurposing (minus the drilled hole).
The Node-RED flow is as follows:
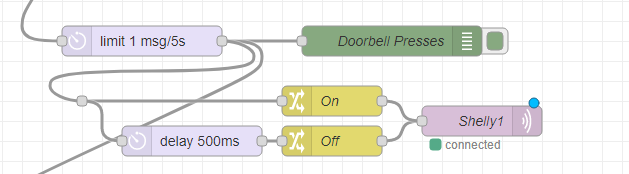
A limiter that drops subsequent messages inside the same 5 seconds (debounce catching).
A logger to debug. An ‘on’ command is sent to the shelly1 and a delayed parallel ‘off’ command fire soon after. This simulates a 500ms button press. More than enough to activate the transmitter as the chime box seems to start playing its tune as soon as the first part of the transmission is received. Code for above is below:
[{"id":"e351118aa9529554","type":"debug","z":"83e0e3b871853a50","name":"Doorbell Presses","active":true,"tosidebar":true,"console":false,"tostatus":false,"complete":"true","targetType":"full","statusVal":"","statusType":"auto","x":450,"y":1800,"wires":[]},{"id":"e7f3814766bd8b17","type":"delay","z":"83e0e3b871853a50","name":"","pauseType":"rate","timeout":"5","timeoutUnits":"seconds","rate":"1","nbRateUnits":"5","rateUnits":"second","randomFirst":"1","randomLast":"5","randomUnits":"seconds","drop":true,"allowrate":false,"outputs":1,"x":200,"y":1800,"wires":[["e351118aa9529554","07d809a4946ad609","28e21dd09c259ea4"]]},{"id":"f28a6abd39747779","type":"delay","z":"83e0e3b871853a50","name":"","pauseType":"delay","timeout":"500","timeoutUnits":"milliseconds","rate":"1","nbRateUnits":"1","rateUnits":"second","randomFirst":"1","randomLast":"5","randomUnits":"seconds","drop":false,"allowrate":false,"outputs":1,"x":250,"y":1900,"wires":[["5e445ec893ca3a79"]]},{"id":"5e445ec893ca3a79","type":"change","z":"83e0e3b871853a50","name":"Off","rules":[{"t":"set","p":"payload","pt":"msg","to":"off","tot":"str"}],"action":"","property":"","from":"","to":"","reg":false,"x":390,"y":1900,"wires":[["ab91fc3fa4f54b37"]]},{"id":"1c4e3104e216989f","type":"change","z":"83e0e3b871853a50","name":"On","rules":[{"t":"set","p":"payload","pt":"msg","to":"on","tot":"str"}],"action":"","property":"","from":"","to":"","reg":false,"x":390,"y":1860,"wires":[["ab91fc3fa4f54b37"]]},{"id":"ab91fc3fa4f54b37","type":"mqtt out","z":"83e0e3b871853a50","name":"Shelly1","topic":"shellies/shelly1-/relay/0/command","qos":"1","retain":"false","respTopic":"","contentType":"","userProps":"","correl":"","expiry":"","broker":"6b7fd4e3.fd9b1c","x":540,"y":1880,"wires":[]},{"id":"28e21dd09c259ea4","type":"junction","z":"83e0e3b871853a50","x":140,"y":1860,"wires":[["1c4e3104e216989f","f28a6abd39747779"]]},{"id":"6b7fd4e3.fd9b1c","type":"mqtt-broker","name":"","broker":"mqtt","port":"1883","clientid":"","autoConnect":true,"usetls":false,"compatmode":false,"protocolVersion":"5","keepalive":"60","cleansession":true,"birthTopic":"","birthQos":"0","birthPayload":"","birthMsg":{},"closeTopic":"","closeQos":"0","closePayload":"","closeMsg":{},"willTopic":"","willQos":"0","willPayload":"","willMsg":{},"sessionExpiry":""}]
Note the offscreen tail out of the limiter. I’ve got a light flasher running too for our ceiling lights near the entry. just 2sec on then off and repeat once more.
Further Expansion
I’ve already added in a very simple motion activated light option for our garage light that is linked to the Unifi Protect camera in our garage. From the “Type Splitter” mentioned earlier just tee off to a “switch” node that filters packets with
msg.payload.payload.camera == <your cameras 24 character alphanumeric id>
(Camera IDs can be found the in the protect web interface. under Unifi Devices, click on the camera you want the ID for and note the change in the last part of the URL after …/devices/####….)
Add a X minute trigger node that sends an ‘on’, wait for X minutes then send ‘off’ to a downstream mqtt out, optionally extend delay on new message and you’re away.